How to install a socket (part II)
Okay, remember last time ? At the end, we had that beautiful orange box fixed to the wall, and still some work to do. Live from Strasbourg, where I'm not installing sockets, and where we use candles when it's dark, I'm telling you today what's next.

First, we sort the wires by colour, because it's much more fancy. Put the red ones (live, the wires that "pull and push" the current) on the left, the green and yellow striped ones (ground, the "security" wires) in the middle, and the blue ones (neutral, those that "receive" the positive or negative current) on the right. Note that in countries other than France, colours and positions may change.

Cut the wires at a "good" length: long enough to manipulate them easily, but short enough so that you can put everything (with the socket) in the orange box eventually. The cables won't suffer, it's like cutting your hair or fingernails. Note however that, to do that, you must be certain that the current is turned off, else YOU may suffer some pain (which can be good to wake you up in the morning, esp. in case of hangover).

How cute it is with its new haircut !

Next, use a wire stripper, you want the wires to get partially naked (much sexier).

That blue wire is so hot I had to put a blur effect on it, since there may be young people reading this blog.

Now, guess what's next ?
What do you think's next ? You must be thinking it's time to connect the wires to the socket using these nose-picking pliers. If we don't do that one day, you'll never have juice in your socket...

Please scroll down.

Quite simple, you just have to screw.

Use the nose-picking pliers to do what they're best at (apart from picking a nose).
As a side note, here is a picture of another (cheaper) kind of sockets, which only confirmed socket installers can install, and believe me, you don't wanna install one of these: you have to prepare longer lenghts for the red and blue wires, which mean it will be a pain to fit everything in the orange box, and you have to screw the wires into the socket, two at a time. You also MUST fix the socket to the grid before fixing the grid, because you physically can't fix the socket to the grid with the wires connected...

But here, we are lucky, we got one of these high end sockets, which my little sister could connect.

Here is how it looks like when the wires are connected to the socket, before fixing the socket to the grid.

Push the socket in the grid. This is the time when you will discover if you cut the wires too long for them to fit in the box...

Yeah! It fits !

Now, since you want your socket to be beautiful, you want it to be level. Here, it isn't...

Unscrew a bit the grid, and turn it a bit so that it's level, and screw it again.
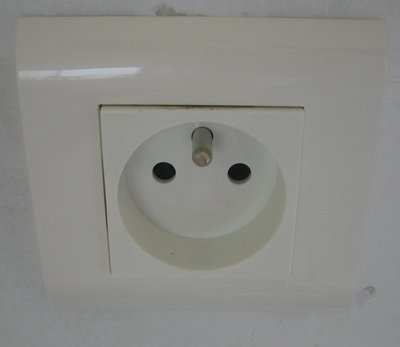
Now, all you have to do is to make your socket put on its nicest dress. Of course, it can be an 80s dress to go to friday night 80s party in the rez, but it doesn't have to.
This is it, now, you know how to install a socket, and you can play that game at home (supervised by an adult). I'm sure you will find that game very funny, especially when you realise that europe's electric power sucks almost as much as in the US, and you eventually end up not using that socket, and lighting candles instead. After all, candles are much more romantic (but don't light candles alone, it's dangerous, ask an adult !)
4. Prepare the Wires
We gotta cut and strip the wires to be able to connect them to the socket.First, we sort the wires by colour, because it's much more fancy. Put the red ones (live, the wires that "pull and push" the current) on the left, the green and yellow striped ones (ground, the "security" wires) in the middle, and the blue ones (neutral, those that "receive" the positive or negative current) on the right. Note that in countries other than France, colours and positions may change.
Cut the wires at a "good" length: long enough to manipulate them easily, but short enough so that you can put everything (with the socket) in the orange box eventually. The cables won't suffer, it's like cutting your hair or fingernails. Note however that, to do that, you must be certain that the current is turned off, else YOU may suffer some pain (which can be good to wake you up in the morning, esp. in case of hangover).
How cute it is with its new haircut !
Next, use a wire stripper, you want the wires to get partially naked (much sexier).
That blue wire is so hot I had to put a blur effect on it, since there may be young people reading this blog.
Now, guess what's next ?
5. Connect
What do you think's next ? You must be thinking it's time to connect the wires to the socket using these nose-picking pliers. If we don't do that one day, you'll never have juice in your socket...
Please scroll down.
5. Connect Fix the Grid
Well, if you were thinking what I think you were thinking, then, you're wrong. You should first fix the grid on the orange box, else, you won't be able to fix the socket, and that wouldn't look very professional, would it ?Quite simple, you just have to screw.
6. Connect
Okay, now, the grid is in place, we can connect the socket. Note that we could have instead fixed the socket on the grid, and screw the grid and socket block on the wall later, but I find it easier like this.Use the nose-picking pliers to do what they're best at (apart from picking a nose).
As a side note, here is a picture of another (cheaper) kind of sockets, which only confirmed socket installers can install, and believe me, you don't wanna install one of these: you have to prepare longer lenghts for the red and blue wires, which mean it will be a pain to fit everything in the orange box, and you have to screw the wires into the socket, two at a time. You also MUST fix the socket to the grid before fixing the grid, because you physically can't fix the socket to the grid with the wires connected...
But here, we are lucky, we got one of these high end sockets, which my little sister could connect.
Here is how it looks like when the wires are connected to the socket, before fixing the socket to the grid.
7. Finnish
Good, we're nearing the end !Push the socket in the grid. This is the time when you will discover if you cut the wires too long for them to fit in the box...
Yeah! It fits !
Now, since you want your socket to be beautiful, you want it to be level. Here, it isn't...
Unscrew a bit the grid, and turn it a bit so that it's level, and screw it again.
Now, all you have to do is to make your socket put on its nicest dress. Of course, it can be an 80s dress to go to friday night 80s party in the rez, but it doesn't have to.
This is it, now, you know how to install a socket, and you can play that game at home (supervised by an adult). I'm sure you will find that game very funny, especially when you realise that europe's electric power sucks almost as much as in the US, and you eventually end up not using that socket, and lighting candles instead. After all, candles are much more romantic (but don't light candles alone, it's dangerous, ask an adult !)
No comment
Comments are closed.